Saturday, October 28, 2017

Hardtop Fitted


New screen & top in place.

The red hardtop is finally attached, but not after a few complications, and lots of bad language.

Because this is the second time I’ve done this, I’d expected a few issues, but it’s always the one from left field that throws you.

The usual problems of fitting and adjusting the strikers were overcome pretty quickly, once I’d remembered that R stands for Right and L for left. There were fewer dramas in cutting gaps in the plastic panels to make space to mount the strikers, although I’m not much of an artist with a Dremel.
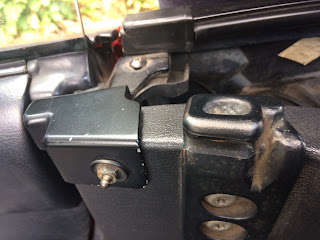
Strikers in place.


The left field issue came up when I attempted to refit the driver’s side seat belt mounting. (It has to be removed to allow access to the area where the strikers are seated).

I undid the bolt, no problem, set the strikers in place, and then set about reassembly.

The seat belt retaining bolt stubbornly refused to engage with the cylindrical sleeve that it sits in.
After about two hours of messing about on the Friday, I gave up and decided to sleep on the problem.
No brilliant ideas lobbed into my subconscious overnight, unfortunately.
This is the offending bolt.


Next day, I had a closer look and noticed that somehow the mounting sleeve had become misaligned. I fashioned a method of pushing it back into place with the shaft of a screwdriver, gaining access through a gap in the lining of the cockpit, at the same time applying downward force on the top of the bolt as I turned it with the spanner. This required a fair bit of dexterity.

Eventually the thread engaged and it bolted home, but the amount of torque I had to apply to turn it in the thread was a bit of a worry, although I recall it was just as tight when I removed it.

Anyway, everything was assembled once this hurdle was overcome, and the hardtop fitted OK, although it does bear on the roll bar.

I think the bar will have to come off. It effectively blocks access to the area behind the seats which is a useful space for bits and pieces. It is a competition roll bar designed to protect the driver in the event of a rollover. I’m not planning any competition, club or otherwise.

So now I have a testarossa*, if in appearance only.
Rear view.

Despite all the advice I’ve received to paint the top to match the body, at this juncture, I’ll leave it red. I prefer it that way, and maybe, like a fungus, the appearance will grow on the various nay-sayers.

I also got around to replacing the windscreen. It had been, at some stage, peppered by small stone chips, and no amount of polishing had removed them.

The new screen makes a great different in low sun conditions, and at night. 

*Redhead, or redtop.

Friday, October 13, 2017

Testarossa


The one I bought when it was mounted on the owner's NA.


My MX5 will soon be a testarossa*

I need to get some striker plates and two Frankenstein bolts and the job will be done.

By way of explanation, gentle reader, these bits and pieces are needed to attach the hardtop to the car.

These are the bits you need.


I've done all this before. I fitted my first MX5 with a hardtop before I sold it. The mounting points are located in exactly the same position in all NA and NB versions, although you have to remove a bit of trim to access them.

These hardtops are like hen's teeth, and are beginning to go for very silly money. I think I was a bit lucky to get hold of this one. I contacted the vendor on the day he advertised it on Gumtree, and was in Brisbane collecting it the next day. The Ute is indeed handy, although there was about 5 mm to spare getting the hardtop under the canopy for the journey home.

His price was reasonable, as it's in pretty good nick, even though it is ten years older than the car.

I will eventually paint it to match the car, but initially I will be driving a testarossa.

Hardtops are a blessing for a number of reasons.

They make the vehicle much more secure. Anyone with a pocket knife can gain entry to a softop. This actually happened to my current car, which explains why it has a relatively new convertible top.

In addition, they are completely weatherproof - although the softops are the same, providing they're properly fitted.

They also increase the car's rigidity if mounted properly.

But for mine, the greatest advantage is the improvement in over-the-shoulder visibility.

Driving an MX5 with the convertible top up is a bit like sitting in the bottom of a bucket when it come to rear visibility.

*Check Google translate. It's Italian.

Update: Trial fitting -

 The hardtop is not compatible with the roll bar, sitting about 5 mm too high - so another job ahead.

What do you reckon, gentle reader? Leave it red, or have it matched?

Sunday, October 1, 2017

A Running Restoration

Interior. Note gear lever knob and lace up wheel cover.
 My slow restoration of the MX5 continues.

One of the most appealing aspects of these cars is the wheel-tyre combination. Unfortunately, in its 17-year life, this example had many unhappy encounters with kerbs.

The technical term is “kerb rash”.
Rimskins not a success.
 So, this needed attention to restore the appearance. I tried a product called Rimskins, but was unable to keep them attached to the wheels. The state of the rim edges probably had something to do with that.

Kerb rash


In the end, I gave up on the Rimskins, and went for a complete (all 4 wheels) rim reconditioning. The process involves grinding back the existing damage on the wheel to ensure there is a smooth surface to work with, and then colour matching with paint to the existing colour of the wheel and finishing with a clear coat and hardener.


Amazing improvementThe result was well worth the outlay, and I would recommend these people.


Another aspect that was contributing to the less-than-concours appearance of the car was the state of the interior. Most of it was honest wear (some call it patina) but the leather wheel and gear lever knob were both well-worn and unsightly.

The gear lever knob was beyond redemption, but when I priced a replacement, I was rocked by the quoted ask (from Mazda spare parts) of $350.

Instead, I found an aftermarket knob for $32. It’s not the real deal, but may have to do until I can source a second-hand part from a wrecker.
Then there’s the leather steering wheel. Short term solution there is the lace-on cover, but I’m looking to restore or replace the well-worn Nardi.

Under the bonnet, the dipstick had snapped off at the top.


The OEM replacement was only $32 - same as the gearshift knob - seems a popular price. The best part of all of the running restoration is that I get to drive the car whilst all this is going on.


That is, after all, the object of the exercise.